Thursday, March 31, 2016

Hydrangea Birthday Card

March 31st is my daughter's 22nd birthday. What better way to celebrate it than to use a new stamp and die set to create her birthday card?

Not only did I use a new stamp and die but I chose to use a new technique–Distress Ink Lifting. Jennifer McGuire has a great video tutorial for this on her blog.

I chose to use the Mondo Hydrangea stamp set by Julie Ebersole and its matching die set, just like Jennifer used in her tutorial.

Because Jennifer said that this technique worked best on card stock, not watercolor paper, I chose a piece of the Thick Whisper White card stock. Using my MISTI, I stamped the hydrangea and leaf using Versamark Ink. On another piece of the paper, I stamped again and also stamped the two blossom images that could be die cut. The stamped images were heat embossed using White Stampin' Emboss Powder.

The next step was to take a distress ink, in my case Picked Raspberry–I wanted to create hydrangeas that were pink with a hint of green–and rub it entirely over the image. I did this for my first set of the stamped images. (For the second set of images, I knew I would be die cutting them so I concentrated on inking only the images and a thin halo around them. I did these images after totally completing the water part of the technique as I didn't want the ink to dry out.)

I love the vibrancy of this ink!

Immediately after inking the matte and images, I took a small paintbrush and dropped water into each section of the images, causing the ink to be lifted away, revealing a paler version of the ink. The ridges of the embossing work to corral the water in each section.

After completing this step, I took some Bundled Sage distress ink, smeared some on my craft mat and then took my wet paintbrush to it. I took this green and added it to the edges of the blossoms, the leaf, and the stem.

I repeated this entire process with the second set of images that I had stamped and then used my heat tool to dry them all thoroughly.

My main stamped panel was trimmed down and I stamped the sentiment from the Rose Wonder stamp set using Basic Black Archival Ink. The stamped matte was then mounted onto a piece of white, self-stick fun foam to help even out the surface. It was then mounted on a very thin matte of Thick Whisper White card stock and onto the front of a Mint Macaron card base.

The other stamped images were die cut and adhered onto the previously stamped image using Dimensionals.

This looked pretty enough but I knew how to pump it up a notch–Wink of Stella! The glimmer from that made it even more beautiful, especially against the Picked Raspberry background. The distress ink dried so well blended that it looked like it was card stock!

I added a bow made from the Minted Macaron 1" Dotted Lace Trim and some rhinestones to complete the card front.

For the inside of the card, I used Picked Raspberry to stamp portions of the hydrangea on a matte of the now retired Naturals White card stock. I inked the edges in both Picked Raspberry and Bundled Sage and adhered the matte with Fast Fuse to complete the card.


I am very pleased with how this card turned out! I liked using the Distress Ink Lifting technique and will definitely use it again.

I'd love it if you'd take the time to leave me a comment below! See you next time.


Monday, March 28, 2016

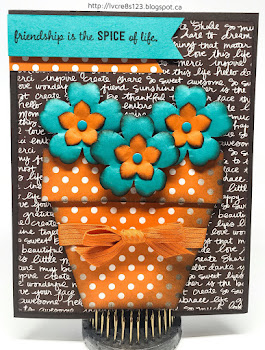
Flower Pot For Global Design Project

You can't imagine my delight when I saw the color challenge for the Global Design Project #29! The colors were definitely my kind of colors! In fact, I had used these colors previously (minus one) in my post, Shake It Off.


It didn't take long for me to plan my design.

I cut an Early Espresso card base for a 4.75 x 6" card and a matte from an Early Espresso text paper from the Neutrals Backgrounds DSP Stack. After inking the edges with Early Espresso, I adhered the matte to the card base and proceeded to punch flowers from Bermuda Bay using the Pansy Punch as well as flowers from Tangelo Twist using the Petite Petals Punch.

Tangelo Twist polka dot paper from the Brights Backgrounds DSP Stack was used for a flower pot and separate piece for the trim on the pot.

Using a sponge dauber, I inked each flower and used a sponge to ink the flower pot pieces in Early Espresso, applying a bit more shading to the shadow side of the pot.

I assembled the flowers using Multi Medium Matte, adding a Bermuda Bay Candy Dot from the Brights set to each flower.

The trim was adhered to the flower pot using Dimensionals and then a Tangelo Twist Ribbon was tied around the pot. The pot was adhered to the card front using Dimensionals. The flowers were also adhered with Dimensionals.

Using a sentiment from the Gift From The Garden, I stamped with Early Espresso onto a strip of Bermuda Bay. I used the Banner Triple Punch to flag one end. I cut a piece of the Tangelo Twist polka-dotted paper for another banner. It was adhered to the card front with Fast Fuse and the sentiment banner was popped up over it with Dimensionals.

For the inside of the card, I used a matte of the now retired Naturals White card stock. I used one of the stamps from the Petite Petals stamp set to stamp flowers in both Bermuda Bay and Tangelo Twist around three edges of the matte, stamping more than once before reinking for some of the flowers. I adhered a strip of the Early Espresso text DSP to the right side of the matte, after inking the edges, and then inked the remaining edges of the matte. I adhered the matte with Fast Fuse to complete the card.


I chose not to make a shaped flower pot card for this challenge, as I preferred to have the flower pot mounted onto the Early Espresso text DSP. I like the way the card came together!

What do you think? Do you like this color combo? Drop me a comment below!


Sunday, March 27, 2016

Spring Butterfly

I absolutely adore the papers in the Birthday Bouquet DSP! Such lovely colors and patterns to play with–what's not to like? These papers were the inspiration for my card today.

Die cutting a butterfly from the Birthday Bouquet DSP using the large die in the Bold Butterfly Framelits was my first step, as it was to be my focal point. I used the small die to cut a butterfly from Watermelon Wonder card stock.

Next, I used my Fun Flower Punch to punch one flower from Watermelon Wonder and another from Blushing Bride. I used the Blossom Bunch Punch as well as a punch from the now retired Itty Bitty Shapes Punch Pack to punch flower centres and one smaller flower using Pool Party, Mint Macaron and Watermelon Wonder card stock. The Bird Builder Punch was used to punch two leaves, one Old Olive and one Mossy Meadow.

My card base was cut from Watermelon Wonder in my new favorite 4.75 x 6" size and a matte was cut from the Perfectly Artistic DSP. Using stamps from the Timeless Textures, I stamped using Pool Party and then taped a piece of Pool Party Glitter Ribbon around the bottom of the matte. It was then adhered to the card front using Fast Fuse Adhesive.

Using a Tea Lace Paper Doily as a base, I designed my flower arrangement and snapped a photo. I then inked the edges of all the flowers parts, leaves and smallest butterfly with matching inks and brushed each piece with Wink of Stella. I also inked the the large butterfly with Soft Suede. Once the pieces were dry, I shaped them using both my Bone Folder and my McGill Paper Blossom Tool Kit. The flowers and butterfly were then adhered together using Multi Medium Matte.

The doily , leaves and large butterfly were adhered with a couple of drops of Multi Medium Matte and then the flowers were adhered with Dimensionals. I added pearls to both the flowers and butterfly.
The sentiment from the Rose Garden stamp set was stamped in Watermelon Wonder on Thick Whisper White and die cut with a die from the Rose Garden Thinlits. It was popped up over the flowers with Dimensionals.

For the inside matte, I used some of the now retired Naturals White card stock. I stamped a flower from the Beautiful Bunch in Blushing Bride and inked the edges using Pool Party. I die cut a butterfly from a piece of the Birthday Bouquet DSP using the smallest butterfly from the Butterflies Thinlits Dies and inked its edges in Soft Suede. It was adhered with Multi Medium Matte. It and the solid part of the flower stamp were coated with Wink of Stella and the matte was adhered with Fast Fuse to complete the card.


I am loving the color combination on this card–it is so airy and Spring-like! Feel free to copy it if you are inspired by these colors.


If you use these colors in a card, drop me a link below. I'd love to take a look!


Monday, March 21, 2016

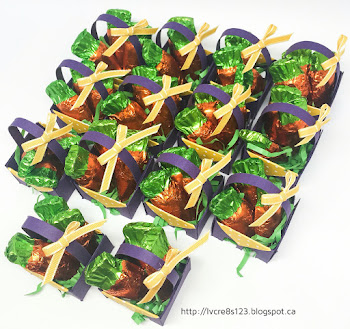
Mini Treat Baskets For Easter

The other day, a customer came through my till at Walmart with a miniature Daffodil plant. Why is it that whenever you see something in miniature it is so much cuter than the full size version? I love Daffodils as they are such a real sign of Spring but miniature ones . . . oh my!

Allison Okamitsu recently showcased a miniature Easter Basket in a blog hop and I knew that I would have to CASE it for some of my colleagues at Walmart!

I started by cutting 3.5" squares of Elegant Eggplant. I also cut 5.5 x .25" strips. I scored the squares at 1" and 2.5" and then rotated the square by 90° and repeated the scoring. I folded on all the score lines.

Leaving one flap folded, I used my Word Window Punch to punch two holes about 1/4" from the edge of the folded flap and up as far as the punch would reach. I then rotated 180° and repeated the punch. I then flipped to the other side, folded the edge and repeated the punching. This created the tiny openings in the side and bottoms of the baskets.

With the punched openings running horizontal, I cut up the vertical scoring to the horizontal score line and then cut in from the corner at an angle to the horizontal score line. I repeated this on the other end and then rotated 180 ° and repeated. this left triangles at each corner.

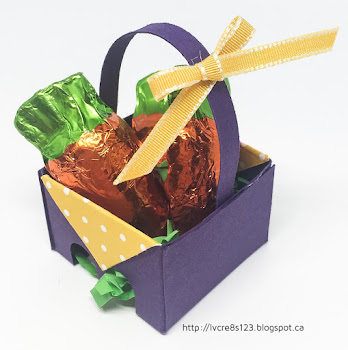
I placed Fast Fuse on each corner and adhered to create a box. I pulled each strip between my fingers to give it a slight curve and then placed Fast Fuse Adhesive at each end. I adhered the ends inside the box on the solid sides to provide a box handle.

I cut a piece of Cucumber Crush Cotton Paper 4 x 12" and folded it in half lengthwise. My Fringe Scissors were used to cut strips which were then crumpled and placed in the miniature baskets.
I nestled three chocolate carrots, found at Dollarama, in the crumpled grass. I formed miniature bows from 1/8" Crushed Curry Ribbon and adhered them to each basket handle using a glue dot.

After posting this, I decided that the little baskets weren't quite cute enough so I went back and added little basket liners to each one! I used a sheet of the now retired Regals Designer Series Paper Stacks because I needed the tiny polka dot Crushed Curry paper to make these.

I cut 1" squares and scored them on the diagonal. I then used glue dots to adhere them to two sides of each basket.


How cute are these? These were so much fun to create! Be sure to check out Allison's version and video tutorial for clearer directions on how to make these sweet little baskets.

Have you made any treat baskets, boxes, or bags for Easter? Let me know in the comments below!


Friday, March 18, 2016

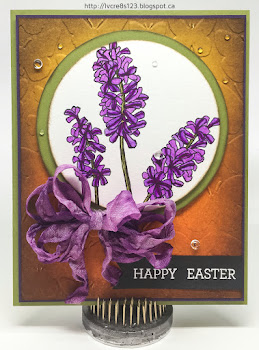
Watercolor Markers, Distress Inks, and Easter

For my card today, I incorporated Stampin Up as well as some of my many other crafting supplies! My card actually started as an entry for a "yellow" color challenge but became something else entirely!

I started by creating an ombré effect using my yellow toned distress inks on Watercolor paper. I used squeezed lemonade, mustard seed, scattered straw, fossilized amber, and wild honey but in the end, I had to rework my ombré so the final lineup was mustard seed, fossilized amber, wild honey, rusty hinge, spiced marmalade and ripe persimmon. To give some definition to the edges, I added walnut stain.

Next, I decided to use my Zig Clean Color Real Brush Markers to color a focal image. I chose to use the Hyacinth from the Helping Me Grow stamp set and stamped it in Basic Black Archival ink on watercolor paper using my MISTI. It is often difficult to get an image stamped perfectly on watercolor paper in one go; the rougher texture of the paper seems to either absorb or deter ink. MISTI to the rescue!

I zapped the image with my heat tool to be sure it was dry before beginning my coloring. I used the following: Lilac, Light Violet, Purple, Mid Green and Olive Green. I just LOVE coloring with these markers because it seems so effortless!

The Big Shot along with a die from the Circles Collection Framelits was used to die cut the colored image as well as a die cut a matte from Old Olive card stock. I used a sponge dauber with Walnut Stain distress ink to give some definition to the edges of both. The colored image was then adhered to the matte with Dimensionals.

I used the Fluttering Embossing Folder to emboss the ombré matte (the only one that would fit since I was making a non-standard card size). I adhered the embossed background to a very thin Elegant Eggplant matte and then attached both to an Old Olive card base. The focal image was adhered to the matte with Dimensionals.

I chose a piece of Whisper White Seam Binding to color with distress inks to match my project. On my craft mat I dabbed wilted violet, dusty concord and seedless preserves. I spritzed them and my ribbon with water and then proceeded to dab my ribbon into the colors until I was satisfied with the results. I kept crinkling the ribbon into a ball in my hands (I wore disposable gloves so my hands would still look like hands when I finished!) and then dried it with my heat tool.

Cutting a small piece off one end of the ribbon, I wrapped the rest around three fingers. I tied it in the middle with the piece I had cut off to form my crinkly bow. I adhered the bow to my card front using Glue Dots.

I stamped my sentiment from the Crazy About You stamp set onto a strip of Basic Black card stock using Versamark and then heat embossed it using White Stampin' Emboss Powder. I used the Banner Triple Punch to flag one end. The sentiment was adhered to the card front with Fast Fuse Adhesive.

To complete my card, I used (for the first time!) some Rainstones that I had purchased from Papertrey Ink some time ago after watching a video tutorial that showed them being used on a card. I thought they looked gorgeous! I adhered some to my card front using a combination of Multi Medium Matte (for the small ones) and Zots Clear Adhesive Dots-Bling Tiny for the larger ones. I got my Zots at Michaels for $7.99 for 325. They work really great! I think I may try them for sequins or other tiny embellishments in the future.


I did not embellish the inside of my card but may do so before giving it out for Easter. Thanks for checking out my post today!


Thursday, March 17, 2016

You're Amazing

My card today evolved totally from a color combination that I had brainstormed while working at Walmart one day.

If you have followed my blog for very long, you know that I love bold, in-your-face colors on my cards and today's colors are no exception!

As I often do, I turned to my Silhouette Cameo design software to plan out my card. I find that it is easier for me to plan out my matte sizes and be sure that my embellishments are in proper proportion on the card.

I started with a Cajun Craze card base of 6 x 4.75". I also cut a smaller matte for the very front of the card. Before deciding on any further mattes, I chose to die cut my flowers and leaves and plan my arrangement for the card front.

The Botanical Builder Framelits Dies were used to cut three flowers from Tempting Turquoise and three from a Tempting Turquoise flowered paper from the Brights Backgrounds DSP Stack. From Cajun Craze I cut some flower centres using the dies but also chose to use the Blossom Bunch Punch. I used the Rose Garden Thinlits to cut three stems of leaves from Chocolate Chip card stock.

I fussed with the flowers and leaves until I had my design planned out, and snapped a photo before removing all the die cuts to shape them with my McGill Paper Blossom Tool Kit. After shaping, I inked the edges with their matching color of ink. I then glued all parts of the flowers together using Multi Medium Matte, using the Brights Candy Dots in Turquoise for the centres.

While planning my flower cluster, I was sure to leave adequate room for my sentiment. I used my MISTI to stamp the sentiment from the Watercolor Wishes Card Kit, in both Tempting Turquoise and then Versamark. I heat embossed it with the now retired Tempting Turquoise Stampin, Emboss Powder.

To coordinate with the leaves, I chose to use a very thin Chocolate Chip matte directly under the front Cajun Craze matte. I adhered these two mattes together with Fast Fuse Adhesive. I chose to use the same flowered Turquoise paper as a matte adhered directly on the card base. For added support for my top mattes, I cut a smaller piece of brown, self adhesive Fun Foam which I adhered to my top mattes and then adhered to the card base using Fast Fuse Adhesive.

I used Multi Medium Matte and Dimensionals to adhere my flowers and leaves to the card front, giving the flower centres a little Wink of Stella for good measure! I placed a few rhinestones around the card front for added sparkle.

For the inside, I used a matte of the now retired Naturals White card stock. I used the leaf stamp from the Rose Wonder stamp set and tiny flowers from the Botanical Blooms stamp set. The matte was adhered with Fast Fuse to complete the card.


I hope you like my card today. I love how these colors work together (though I'm sorry that the flowers look more like Marina Mist than Tempting Turquoise; no amount of camera fiddling allowed me to get a truer color for them!).


Wednesday, March 16, 2016

Helping Me Grow Thank You For Global Design Project


No creating on Monday. My granddaughter, Raine, was sick so she spent the day with me. She didn't want to do anything but lay on the couch so we immersed ourselves in Barney and Curious George. Luckily, whatever she had didn't last long and the next day she was back to her usual self and off to daycare.

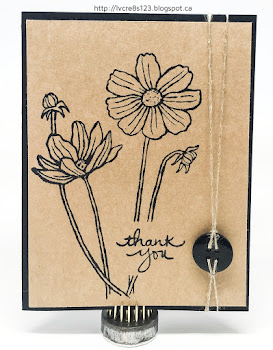
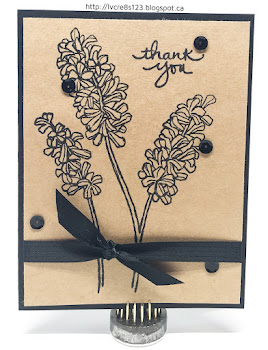
Today I designed two simple thank you cards using the Helping Me Grow stamp set.

I started by cutting standard card bases from Basic Black card stock and mattes from Kraft. Using my MISTI to help me with alignment, I positioned my daisy stamp and then decided to insert the thank you sentiment into the actual stamped area so I used my Post-It Label Roll to mask over a section on the bottom right of the card. Using Jet Black Stazon ink, I stamped the daisy.

After removing the masking, I changed to the thank you sentiment stamp from the Endless Thanks stamp set. I stamped it in the place where the masking had created a space in the flower stems. After the ink was dry, I adhered the stamped matte to the card front using Dimensionals.

I threaded a black 4-holed button onto two separate pieces of Linen Thread and then placed glue dots on the back of the button. Positioning the button next to the sentiment, I tied the threads inside the card. To complete the card while keeping it simple, I used the Curvy Corner Trio Punch to punch the corners of a Naturals Ivory card stock matte and then adhered it with Fast Fuse Adhesive.


The second card was also stamped with Jet Black Stazon ink but this time the Hyacinths (at least I think that's what they are!) were stamped on the Kraft matte and the thank you sentiment was stamped at the top. A length of Basic Black 3/8" Stitched Ribbon was taped around the bottom of the matte and then a separate piece was knotted in the front. The matte was then adhered to the card front using Dimensionals. A sprinkling of black sequins completed the card front.

The inside was kept simple but elegant by using the Curvy Corner Trio Punch again on Naturals Ivory card stock.


I've entered this card in the Global Design Project #027. The theme this time is Thank You cards.

#gdp027

Why not click on the image above and come and play?


Tuesday, March 15, 2016

Birthday Card For Photography Buff

My brother's birthday was March 14. He is a photography and videography buff so I decided to make him a camera-themed birthday card.

Of course, the first place I looked for ideas was Pinterest. I knew I wanted to make use of the Snapshot stamp as well as the Peachy Keen stamp set. I also thought I could work in the use of the On Film Framelits. These are all retired products from Stampin Up but I love them!

The beautiful card by Michele Reynolds was the one I chose to CASE .

I started by cutting a standard card base from Thick Whisper White card stock. From Real Red, I cut a matte and embossed it using a Cuttlebug Embossing Folder called Spots & Dots because I thought it was reminiscent of camera lenses.

Black Soot Distress Ink was used to rub across the raised portions of the embossing as well as to ink the edges of the matte. I used Dimensionals to adhere it to the card front.


Using the polaroid die from the On Film Framelits, I die cut a frame from the Thick Whisper White as well as one from self adhesive Fun Foam. I also cut pieces of Basic Black and Window Sheet to fit under the frame.

I used White Stazon ink and my MISTI to stamp the sentiment from the Perfect Pennants stamp set on the piece of Window Sheet. The MISTI is especially good for stamping on acetate because inked stamps have the tendency to slip on the acetate causing smeared prints but the MISTI keeps the stamp and the acetate stationary resulting in a perfect print.

Once dry, I used Multi Medium Matte to glue both the Window Sheet and the Basic Black card stock behind the Whisper White frame. I then glued the Fun Foam frame to the stack and then peeled off the adhesive backing and adhered the stack to the card front.

I used the small camera die to cut three cameras from Real Red and one from Basic Black card stock. I used the Black Soot Distress Ink to rub over the red cameras. I added rhinestones to the lens of each camera and then used Dimensionals to adhere them to the card front.

The Balloon Bouquet Punch was used to punch three balloons from a Real Red polka dot paper from the retired Brights Designer Series Paper Stack. I chose the retired rather than the current one because I wanted small polka dots for the balloons. I used Black Soot Distress ink to ink the edges of each balloon, adding a bit more shadow to the right side.

I tied lengths of Basic Black Baker's Twine to each balloon and then attached them to the card front using Dimensionals. I used a glue dot to adhere the twine ends under a button from the Neutrals Designer Buttons. I topped the button with a knotted 1/8" Real Red Ribbon, now retired.

For the inside of the card, I stamped once with the Snapshot stamp and three times with the camera stamp from the retired Peachy Keen stamp set, using Smoky Slate ink.

I'm pleased with how this card turned out and I think my brother will like it!


Do you have a photographer in your life? Or are you the photographer? Drop me a comment below and let me know!


Wednesday, March 9, 2016

Birthday Blooms and Botanicals Meet Shabby Chic

Time to change things up a bit by combining some watercoloring with a shabby chic style!

Today's design of this early Mother's Day card resulted from my color choice for watercoloring the lovely Birthday Blooms stamp. I have seen a lot of variations of this flower being colored but not too many yellow ones. I decided that I would use a different yellow hue for the flower by combining So Saffron and Delightful Dijon for a rich, dark yellow hue.

I started by stamping on watercolor paper with Basic Black Archival ink. I used my MISTI so I was then able to stamp in Versamark which allowed me to heat emboss using Clear Stampin' Emboss Powder.

Using my Aqua Painter, I wet a few sections of the stamp at a time and then colored the sections with So Saffron reinker. I used my heat tool to dry my work and then added in some shadowed areas using the Delightful Dijon reinker.

For the centre of the flower I used Soft Suede reinker. For the leaves, I used Old Olive and after drying, Mossy Meadow for the shadows.After completely drying the my work, I fussy cut the flower.

Next, I cut two ovals, Hello Honey and Mossy Meadow, from papers in the Botanical Gardens DSP. I used a Distress Tool to distress the edges of each. I sponged the edges with Delightful Dijon and Cajun Craze. These were adhered using Dimensionals. The flower was also adhered in the same way.

I cut a card base for a 6 x 4.75" card from Delightful Dijon. After scoring and folding, I distressed the edges and sponged them and the top of the card with Delightful Dijon. I cut a flowered matte from the Botanical Gardens DSP and distressed its edge and inked it with Cajun Craze. I wrapped two layers of the Delightful Dijon 1" Ribbon around the matte (two layers to make the color deeper) and taped the ends on the back. The matte was adhered to the card base using Fast Fuse Adhesive.

I adhered a small strip of paper to the middle of the ribbon and put Fast Fuse Adhesive on it. I layered some Lost Lagoon Thick Twine, from the now retired In Colors Accessory Pack, over the adhesive to accentuate the tiny flowers on the paper. The oval mattes were then adhered over top with Dimensionals.

I used the banner die from the Large Numbers Framelits Dies to die cut a piece of Cajun Craze patterned paper from the Botanical Gardens DSP and another from Cajun Craze card stock. I stamped the sentiment from the Crazy About You Stamp Set on the patterned paper with Basic Black Archival ink and stamped again with Versamark. I heat embossed with Clear Stampin' Emboss Powder and then layered the patterned paper sentiment on top of the Cajun Craze card stock for stability. This was adhered to the card front with Dimensionals.

Inside the card, I cut a matte from the same flowered DSP. I cut a smaller matte from the now retired Naturals White card stock. I distressed both mattes, inking the edges with Cajun Craze and Delightful Dijon. I stamped the sentiment from the First Sight Stamp Set in Mossy Meadow. The mattes were layered and adhered inside the card with Fast Fuse Adhesive.


I really like the shabbiness and the rich hues in this card!

Have you tried the Shabby Chic style? Let me know in the comments below!


Tuesday, March 8, 2016

Botanical Wedding Card

It happened again the other day.

I was at work at Walmart, waiting on another customer, when I spotted a new magazine in the rack. I quickly recognized the colors of Blushing Bride and Very Vanilla, on a background of green and a card idea started bubbling on the fringes of my mind! Here's the magazine cover that sparked my creative juices:


My vision for this card was that of a bride's bouquet, complete with ribbons and pearls on a lovely green background. To be able to fit in both the bouquet and ribbons, I chose a 5 x 7" format for my card.

I cut a matte that was 4.75 x 6.5" so that it would fit within the embossing folder I wished to use–Craft Concepts Tuscan Tiles. After embossing, I used Garden Green ink with a sponge to color the raised portions of the embossing. I adhered the matte to a 5 x 7" Cucumber Crush card base.

Next, I chose a circle die from the Circles Collection Framelits Dies and used that as a frame to create my bouquet simply by laying it on top of my embossed matte and adding flowers within it.

Using the Botanical Builders Framelits Dies, I cut flowers from Blushing Bride and Pink Pirouette as well as a couple of centres from the Blushing Bride Glimmer Paper. I also punched flowers using one of the punches from the Itty Bitty Accents Punch Pack and one from the now retired Itty Bitty Shapes Punch Pack. I inked the edges of the pink flowers with Strawberry Slush and the Blushing Bride ones with Calypso Coral. I also shaped them using the McGill Paper Blossom Tool Kit.

I assembled the few flowers that needed centres and then started adding flowers to the circle die on my card front. I started by adding the largest flowers, filled in with the next largest small flowers and finally the smallest flowers. Once I was happy with the design, I snapped a photo for reference and then removed all but the largest flowers.

Circle die used to arrange the blossoms in a circle.

One by one, I used Multi Medium Matte to adhere each flower to the card front. Once I had filled up the circle, I removed the die and then added pearls to the centre of each blossom.

I used Glue Dots to adhere a bow of Pink Pirouette Seam Binding and a length of Blushing Bride Sequin Trim beneath the bouquet.

On vellum card stock I stamped the sentiment in Calypso Coral using the MISTI and both the Crazy About You and the Number of Years Stamp Sets. I also stamped in Versamark and then heat embossed with Clear Stampin' Emboss Powder. I die cut the sentiment using a die from the Large Numbers Framelits Dies. I placed two pearls on the front of the sentiment and then positioned glue dots below them on the opposite side to adhere the banner to the card front.

For the inside of the card, I cut a matte from the now retired Naturals White card stock. I used Cucumber Crush to stamp the sentiment from the Beautiful Ride Stamp Set and added some flowers from the Bloomin' Love Stamp Set using Calypso Coral. I added the couple stamp in Blushing Bride to the bottom of the card. I inked the edges with Blushing Bride and then adhered the matte with Fast Fuse to complete the card.


Close up details.


I love the richness created by the embossing and sponging on the card front and the flowers looks so nice on top of it!

Let me know what you think by dropping me a comment below!


Monday, March 7, 2016

March Stamping Class Projects

My stamping group met on Friday night for a fun-filled evening of card making and some wonderful treats from Marilyn and Michelle!

Our first card was a new technique for the group–a skirt fold or other tutorials refer to it as a drapery fold.

I had been seeing this technique used on a few cards on Pinterest and thought it was delightful! I consulted a tutorial on Splitcoast Stampers as well as one on by Song of My Heart Stampers and used their info to produce the card in my blog post, Fancy Fold Botanicals For Stampin' Royalty. For stamping class, I needed to modify the technique so that we could use paper from a 6 x 6" paper stack.

We started with a piece of 3 x 6" paper from the Love Blossoms DSP. It was scored at 2, 2.25, 3.25, 3.5, 4.5 and 4.75." A pencil mark was placed at 1.25" from the top right corner and another mark was placed at the bottom at the first 2" score line.

A trimmer was used to trim diagonally from the 2" score line to the 1.25" mark. The paper was then folded, accordion-style, starting with a valley fold at the 2" score line. This produced the "skirt" pleats. It was necessary to trim off .25" from the right end for the folded piece to fit exactly on a 4.25 x 5.5" matte.

Because there wasn't as long a piece of paper to work with as in the tutorials I referred to for this technique, the amount of patterned paper showing from the opposite side was not a lot, but the technique was still effective.

We applied liquid glue to the back of the pleats and then used a sponge and Early Espresso to add detail to the top of the pleat folds. The top pleats were then glued in place.

Using the MISTI, the sentiment from the Help Me Grow Stamp Set was stamped with Rose Red ink onto the bottom right corner of a 4.25 x 5.5" Blushing Bride matte, after finding the correct position with the pleated panel.

The top 3.5" of the matte was then embossed using the Decorative Dots Embossing Folder. A sponge was used to apply Blushing Bride ink to the raised dots. The matte was then adhered to the Blushing Bride card base using Fast Fuse Adhesive.

A .75" strip of Dazzling Diamonds Glimmer Paper was adhered to the top of the pleated panel using Fast Fuse Adhesive, offsetting it about 1/8" above the panel. Dimensionals were then used to adhere the pleated panel to the matte.

The Big Shot and Magnetic Platform were used with the Botanical Builders Framelits to die cut the flower, leaves and fern from Garden Green and Rose Red card stock. Early Espresso was sponged on the edges of each and then the McGill Paper Blossom Tool Kit was used to shape the die cuts.

Placement on top of the Dazzling Diamonds strip was determined and then the leaves and fern were glued in place using both Fast Fuse and the Fine Tip Glue Pen.

A "thread nest" was made with Linen Thread and adhered with Glue Dots and then the flower was adhered with a Dimensional. An Iced Rhinestone was added to the flower centre to complete the card.


Our second card was a sympathy card created with the Rose Garden Thinlits Die.

The design for this card has appeared several times on pinterest in several color variations. It makes for a very striking card. However, nowhere could I find a tutorial as to how this card was made! Looking at the photos, it just was not immediately evident to me how the card was made. Because of this, I decided that I was going to work with the die to figure out how the card was made so we could make it in class! Hopefully, this will help someone else who is trying to make this card.

We started by using a 3.5 x 4.75" Sahara Sand matte and positioned the die on the matte so it hung off both the top and the bottom right by a little bit. We used a dryer sheet under the card stock to make it easy to separate the die cut from the pieces and we saved the right side of the matte from which the rose was cut.

Using a 3.5 x 4.75" matte of Blackberry Bliss, the retained piece of Sahara Sand was glued in place using liquid glue. The Fine Tip Glue Pen was used to apply glue to the die cut rose and then it was carefully laid in place on the Blackberry Bliss matte, placing the two largest petals of the rose die cut in place first. By doing this, the other edges of the die cut fall into place naturally, making it very easy to get the rose into place next to the Sahara Sand card stock piece. A piece of scrap paper was placed over the die cut allowing the die cut to be smoothed over with a hand to ensure it was properly adhered.

The sentiment was stamped on a scrap of Sahara Sand using Blackberry Bliss and then die cut. The edges were inked with a sponge and then the sentiment was adhered to the card front using Dimensionals.

The edges of a 4 x 5.25" matte from the now retired Painted Blooms DSP was inked with Blackberry Bliss and adhered to a Sahara Sand card base using Fast Fuse Adhesive. The matte with the die cut rose was adhered to the DSP matte using Dimensionals.

The second sentiment was stamped inside the card using Blackberry Bliss to complete the card.


I'm pleased with both these cards from class! Using the Stampin' Up dies can so quickly produce a stunning card!


Thursday, March 3, 2016

Love You Sew

As a child growing up, I remember my mother often sitting at the sewing machine, putting the final touches on a skirt or blouse or Halloween costume for me.

In high school, when I took Home Ec and learned how to sew, I was quite proud of myself for being able to sew something that I could actually wear!

However, my love for sewing didn't last long. When I wanted to sew something new at home, my mother tried to teach me her method of laying out the pattern on the fabric.

In school, I had found it quite easy–follow the picture in the pattern directions! My mother did not take this easy route. Instead, she had to fold the fabric and lay out the pattern in countless configurations to gain about 12 more inches of leftover fabric to throw in the leftover fabric bin!

I just couldn't wrap my head around how to do it her way and of course it had to be done her way. So, I said so long to sewing until I was out of the house and could lay out the pattern according to the directions but my love for sewing just wasn't there anymore!

Despite my history with sewing, I decided that my card design for today required me to do some stitching on the card itself!

To begin, I cut a standard Basic Black card base and a Hello Honey matte. I cut another matte from a piece of the Botanical Gardens DSP. I then cut a square of Cajun Craze and proceeded to create zig zag edges (like those done by pinking shears) by using the Finishing Touches Edgelits.

I used a template from the Essentials Paper-Piercing Pack to pierce holes in the zig zag matte. I used two strands of Gold Metallic Thread to cross stitch across the top of the matte, leaving a long tail of thread.

On a scrap of Very Vanilla card stock I stamped the spool of thread from the Love You Sew Stamp Set (this is a hostess set you can only order as a hostess!) using Basic Black Archival ink. I fussy cut this and then wound a length of the Gold Metallic Thread around it, securing it with Fast Fuse Adhesive. I then wound a little from the end of the stitching thread around the spool and placed a Dimensional on the back.

I used Versamark to stamp the sentiment on the Cajun Craze matte and then heat embossed it using Gold Stampin' Emboss Powder.

I adhered the Botanicals matte to the Hello Honey with Fast Fuse and then those mattes to the card front using Dimensionals. I angled the Cajun Craze matte and adhered it to the card front using both Fast Fuse and Dimensionals.

I wound the leftover thread from the stitching in a circle around the sentiment and secured one edge with the Fine Tip Glue Pen while attaching the other end to the spool. I adhered the spool on the matte using the Dimensional. I added a lick of Wink of Stella to top and bottom of the spool.

To cover the glue spot by the thread and to add further embellishment, I used to Hello Honey Botanical flowers and one Mint Macaron Flower cut with one of the Itty Bitty Accents Punches. Each flower was adhered with a Glue Dot and given a generous coat of Wink of Stella. Rhinestones were added to the centres. A scattering of crystal sequins completed the front of the card.

For the inside, I used a matte from the now retired Naturals Ivory card stock. I adhered a strip of the Botanicals DSP to the bottom and then used Versamark to stamp the ferns from the Awesomely Artistic Stamp Set around the end. I heat embossed them using Gold Stampin Emboss Powder and adhered the matte to the inside of the card using Fast Fuse Adhesive.


I think that my stitching is presentable on this card. What do you think? What's your history with sewing? Drop me a comment below and let me know!


Wednesday, March 2, 2016

Brick Wall And Vases For Global Design Project

Today's card is for the Global Design Project #025. This is a card that I planned out while working at Walmart on Monday (we weren't busy at the time).

Global Design Project #025 Colour Challenge

I was drawn to this color scheme, even though it is not one I would usually use in my card designs. My only regret is that the yellow wasn't a deeper yellow like Delightful Dijon.

For me, this was a perfect opportunity for a high contrast card. (Is there any other kind?!!) I love the way that Smoky Slate and Basic Gray look next to each other.

I started by cutting one of my favorite sizes of card bases–4.75 x 6"–from Basic Gray. I also cut a matte from Thick Whisper White.

Next, I used the window die from the Hearth & Home Framelits to die cut three window frames from Basic Gray. I glued these together to provide a thicker, more stable window frame.

My design idea was to showcase a window on the outside of a home so I wanted to use the Brick Wall Embossing Folder for my card. However, the window needed to be cut first or else the embossing would get flattened if I tried to cut it after embossing.

Because I wanted to have my window cut right into the card itself, I needed to do a bit of measuring to ensure that everything worked out properly.

I determined the position of the window frame on the matte and then drew light pencil lines on the inside of the window panes. After removing the window frame, I drew lines past the lines already there and connected them to form a rectangle slightly larger than the inner measurements of the window. I used my Stampin' Trimmer to cut out the hole for the window and then I used that hole to draw lines again but on the card front. I cut the hole for the window out of that as well.

With the hole in place, I then drew pencil marks through the hole in the card front onto my watercolor matte for the inside of the card. This allowed me to determine where to stamp my image. I masked off the sentiment part of the stamp and stamped the vases in Basic Black Archival ink and set the matte aside to dry.

Next, I embossed the Whisper White matte using the Brick Wall Embossing Folder. Using sponge daubers and both Smoky Slate and Basic Gray inks, I inked up the bricks. I finished by inking the edges of the matte with Basic Gray.

After erasing leftover pencil lines, I used my Aqua Painter with reinkers for Daffodil Delight, Smoky Slate and Basic Gray to color the stamped image. I used my heat tool to ensure it was completely dry and then adhered it to the inside of the card with Fast Fuse Adhesive.

Fast Fuse was also used to adhere the brick embossed matte to the card front. Once it was in place, I used Multi Medium Matte–very carefully (see yesterday's post to find out why!)–to adhere the window frame to the front of the card.

To finish the card, I stamped the sentiment from Vivid Vases by first masking off the vases and then stamping with Basic Black on a strip of Daffodil Delight. I used this handy chart to determine the length I needed for creating a banner with the Triple Banner Punch. I adhered the sentiment to the card front using Dimensionals to complete my card.


I am very pleased that the card I had envisioned turned out even better than I had anticipated!

Have you tried making a card for the Global Design Project yet? If not, why not give it a try? It's a great way to get your creative juices flowing!